Introduction to the command-line interface
For readers at home: this chapter is covered in the Your new friend: Command Line video.
It’s exciting, right?! You’ll write your first line of code in just a few minutes! :)
Let us introduce you to your first new friend: the command line!
The following steps will show you how to use the black window all hackers use. It might look a bit scary at first but really it’s just a prompt waiting for commands from you.
Note Please note that throughout this book we use the terms ‘directory’ and ‘folder’ interchangeably but they are one and the same thing.
What is the command line?
The window, which is usually called the command line or command-line interface, is a text-based application for viewing, handling, and manipulating files on your computer. It’s much like Windows Explorer or Finder on the Mac, but without the graphical interface. Other names for the command line are: cmd, CLI, prompt, console or terminal.
Open the command-line interface
To start some experiments we need to open our command-line interface first.
Depending on your version of Windows and your keyboard, one of the following should open a command window (you may have to experiment a bit, but you don’t have to try all of these suggestions):
- Go to the Start menu or screen, and enter “Command Prompt” in the search field.
- Go to Start menu → Windows System → Command Prompt.
- Go to Start menu → All Programs → Accessories → Command Prompt.
- Go to the Start screen, hover your mouse in the lower-left corner of the screen, and click the down arrow that appears (on a touch screen, instead flick up from the bottom of the screen). The Apps page should open. Click on Command Prompt in the Windows System section.
- Hold the special Windows key on your keyboard and press the “X” key. Choose “Command Prompt” from the pop-up menu.
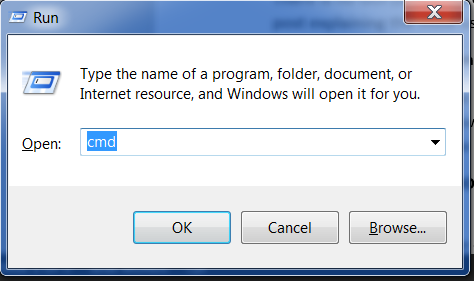
- Hold the Windows key and press the “R” key to get a “Run” window. Type “cmd” in the box, and click the OK key.
Later in this tutorial, you will need to have two command windows open at the same time. However, on some versions of Windows, if you already have one command window open and you try to open a second one using the same method, it will instead point you to the command window you already have open. Try it now on your computer and see what happens! If you only get one command window, try one of the other methods in the list above. At least one of them should result in a new command window being opened.
You now should see a white or black window that is waiting for your commands.
The command-line Prompt
Now you know how to open a command line, we just need to understand what the “prompt” is.
On Windows, you probably see a >, like this:
command-line
>Take a look at the Linux section just above now — you’ll see something more like that when you get to PythonAnywhere later in the tutorial.
Each command will be prepended by a $ or > and one space, but you should not type it. Your
computer will do it for you. :)
Just a small note: in your case there may be something like
C:\Users\ola>before the prompt sign, and this is 100% OK.
The part up to and including the $ or the > is called the command line prompt, or prompt
for short. It prompts you to input something there.
In the tutorial, when we want you to type in a command, we will include the $ or >, and
occasionally more to the left. Ignore the left part and only type in the command, which starts after the prompt.
Your first command (YAY!)
Let’s start by typing this command:
command-line
> whoamiAnd then hit enter. This is our result:
command-line
$ whoami
olasitarska
As you can see, the computer has just printed your username. Neat, huh? :)
Try to type each command; do not copy-paste. You’ll remember more this way!
Basics
Each operating system has a slightly different set of commands for the command line, so make sure to follow instructions for your operating system.
If you make a typo, you can use the left and right arrow keys to move your cursor, backspace and delete to edit the command. Most command lines don’t support using the mouse to move the cursor.
Let’s try this, shall we?
Current directory
It’d be nice to know where are we now, right? Let’s see. Type this command and hit enter:
command-line
> cd
C:\Users\olasitarska
Note: ‘cd’ stands for ‘change directory’. With PowerShell you can use pwd just like on Linux or macOS.
You’ll probably see something similar on your machine. Once you open the command line you usually start at your user’s home directory.
Learn more about a command
Many commands you can type at the command prompt have built-in help that you can display and read! For example, to learn more about the current directory command:
Adding a /? suffix to most commands will print the help page. You may need to scroll your command
window up to see it all. Try cd /?.
List files and directories
So what’s in it? It’d be cool to find out. Let’s see:
command-line
> dir
 Directory of C:\Users\olasitarska
05/08/2020 07:28 PM <DIR>      Applications
05/08/2020 07:28 PM <DIR>      Desktop
05/08/2020 07:28 PM <DIR>      Downloads
05/08/2020 07:28 PM <DIR>      Music
...
Note: In PowerShell you can also use ‘ls’ like on Linux and macOS.
Change current directory
Now, let’s go to our Desktop directory:
command-line
> cd DesktopCheck if it’s really changed:
command-line
> cd
C:\Users\olasitarska\Desktop
Here it is!
PRO tip: if you type
cd Dand then hittabon your keyboard, the command line will automatically fill in the rest of the name so you can navigate faster. If there is more than one folder starting with “D”, hit thetabkey twice to get a list of options.
Create directory
How about creating a practice directory on your desktop? You can do it this way:
command-line
> mkdir practiceThis little command will create a folder with the name practice on your desktop. You can check if it’s there by looking on your Desktop or by running a ls or dir command! Try it. :)
PRO tip: If you don’t want to type the same commands over and over, try pressing the
up arrowanddown arrowon your keyboard to cycle through recently used commands.
Exercise!
A small challenge for you: in your newly created practice directory, create a directory called test. (Use the cd and mkdir commands.)
Solution:
command-line
> cd practice
> mkdir test
> dir
05/08/2020 07:28 PM <DIR>      test
Congrats! :)
Clean up
We don’t want to leave a mess, so let’s remove everything we did until that point.
First, we need to get back to Desktop:
command-line
> cd ..Using .. with the cd command will change your current directory to the parent directory
(that is, the directory that contains your current directory).
Check where you are:
command-line
> cd
C:\Users\olasitarska\Desktop
Now time to delete the practice directory:
Attention: Deleting files using
del,rmdirorrmis irrecoverable, meaning the deleted files will be gone forever! So be very careful with this command.
On Windows PowerShell:
command-line
$ rm -r practiceOn Windows Command lPrompt:
command-line
> rmdir /S practice
practice, Are you sure <Y/N>? Y
Done! To be sure it’s actually deleted, let’s check it:
command-line
> dirExit
That’s it for now! You can safely close the command line now. Let’s do it the hacker way, alright? :)
command-line
> exitCool, huh? :)
Summary
Here is a summary of some useful commands:
| Command (Windows) | Command (Mac OS / Linux) | Description | Example |
|---|---|---|---|
| exit | exit | close the window | exit |
| cd | cd | change directory | cd test |
| cd | pwd | show the current directory | cd (Windows) or pwd (Mac OS / Linux) |
| dir | ls | list directories/files | dir |
| copy | cp | copy file | copy c:\test\test.txt c:\windows\test.txt |
| move | mv | move file | move c:\test\test.txt c:\windows\test.txt |
| mkdir | mkdir | create a new directory | mkdir testdirectory |
| rmdir (or del) | rm | delete a file | del c:\test\test.txt |
| rmdir /S | rm -r | delete a directory | rm -r testdirectory |
| [CMD] /? | man [CMD] | get help for a command | cd /? (Windows) or man cd (Mac OS / Linux) |